Google’s primary writing app, Google Docs, is much more than a text tool. Sure, it can be used to jot down notes, but this all-purpose application is also great at preparing presentations, compiling reports, and drafting booklets.
But if you’re doing any of the above, you’ll need some eye-catching visuals. Adding images to Google Docs is easy. It only takes a few seconds to upload photos or insert graphics, and you’ve many tools to move, edit, or crop those images once they’re in your document.

How to insert images in Google Docs
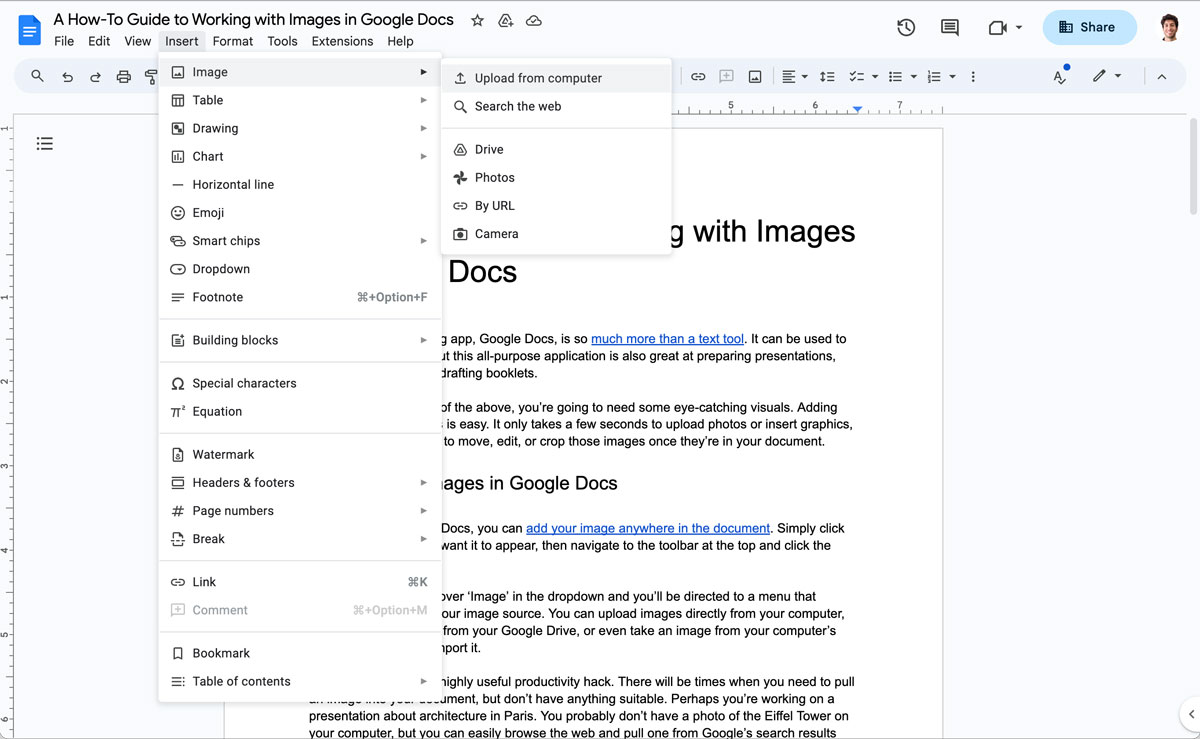
Once you’re in Google Docs, you can add your image anywhere in the document. Simply click your cursor where you want it to appear, then navigate to the toolbar at the top and click the ‘Insert’ tab.
From there, just hover over ‘Image’ in the dropdown, and you’ll be directed to a menu that prompts you to select your image source. You can upload images directly from your computer, search the web, grab it from your Google Drive, or even take an image from your computer’s camera and instantly import it.
This selection tool is a handy productivity hack. Sometimes you need to pull an image into your document but have nothing suitable. Perhaps you’re working on a presentation about architecture in Paris. You probably don’t have a photo of the Eiffel Tower on your computer, but you can easily browse the web and pull one from Google’s search results into your Doc. Or, if you have a license to use a specific photo from an online gallery, enter the URL and, voila, the Eiffel Tower is now in your Doc.
Another helpful hack if you’re short on time is to copy and paste an image from your computer or the web into your document using the keyboard shortcuts Ctrl C and Ctrl V. And if that’s not quick enough, you can also drag and drop an image directly into the application.
How to delete an image from Google Docs
Don’t panic if you find a better image of the Eiffel Tower. Deleting the original is easy.
You can erase your image by right-clicking on it and selecting ‘delete’ from the menu or, even easier, simply delete it the way you would text - hit the backspace key to make it disappear.

How to move an image in Google Docs
If you’re adding an image to a page, the standard way is to put it between paragraphs, but if you want it to look more polished, you can play around so the text flows around, in front or behind your image.
Firstly, make sure your document is in pages format ie it has page breaks and margins. You can’t position or edit your images unless this is enabled.
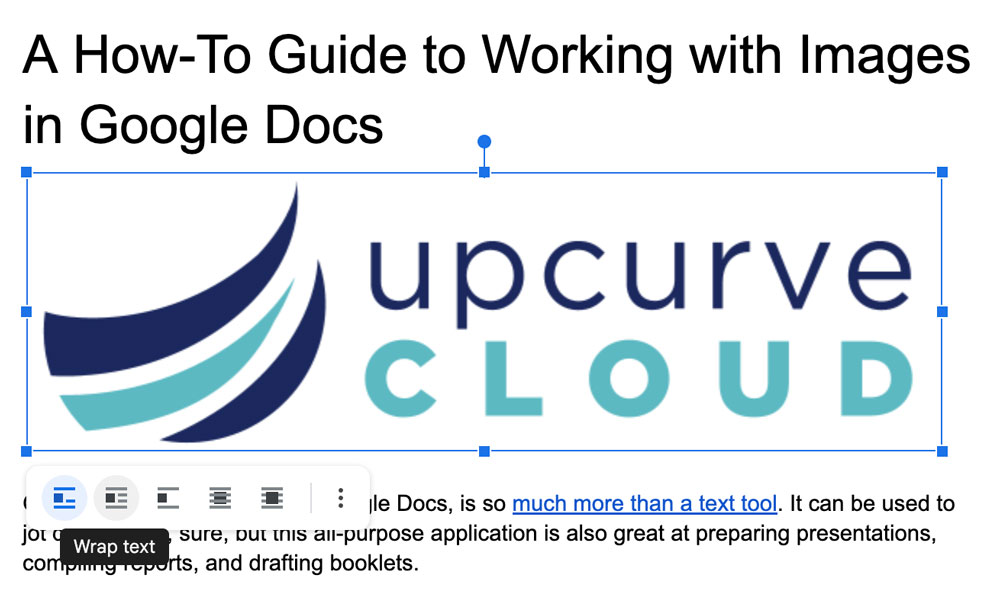
Now, you can adjust your graphic so it’s better integrated into the text - off to one side with text flowing around it - or layered either in front or behind. Just click on your image, and you’ll see a menu of icons at the bottom, showing its positioning. These give you the following options:
- In line
- Wrap text
- Break text
- Behind text
- In front of text
If you’re sticking with the standard break text format, you can adjust your settings so the image moves with the page or is in a fixed position.

How to edit an image in Google Docs
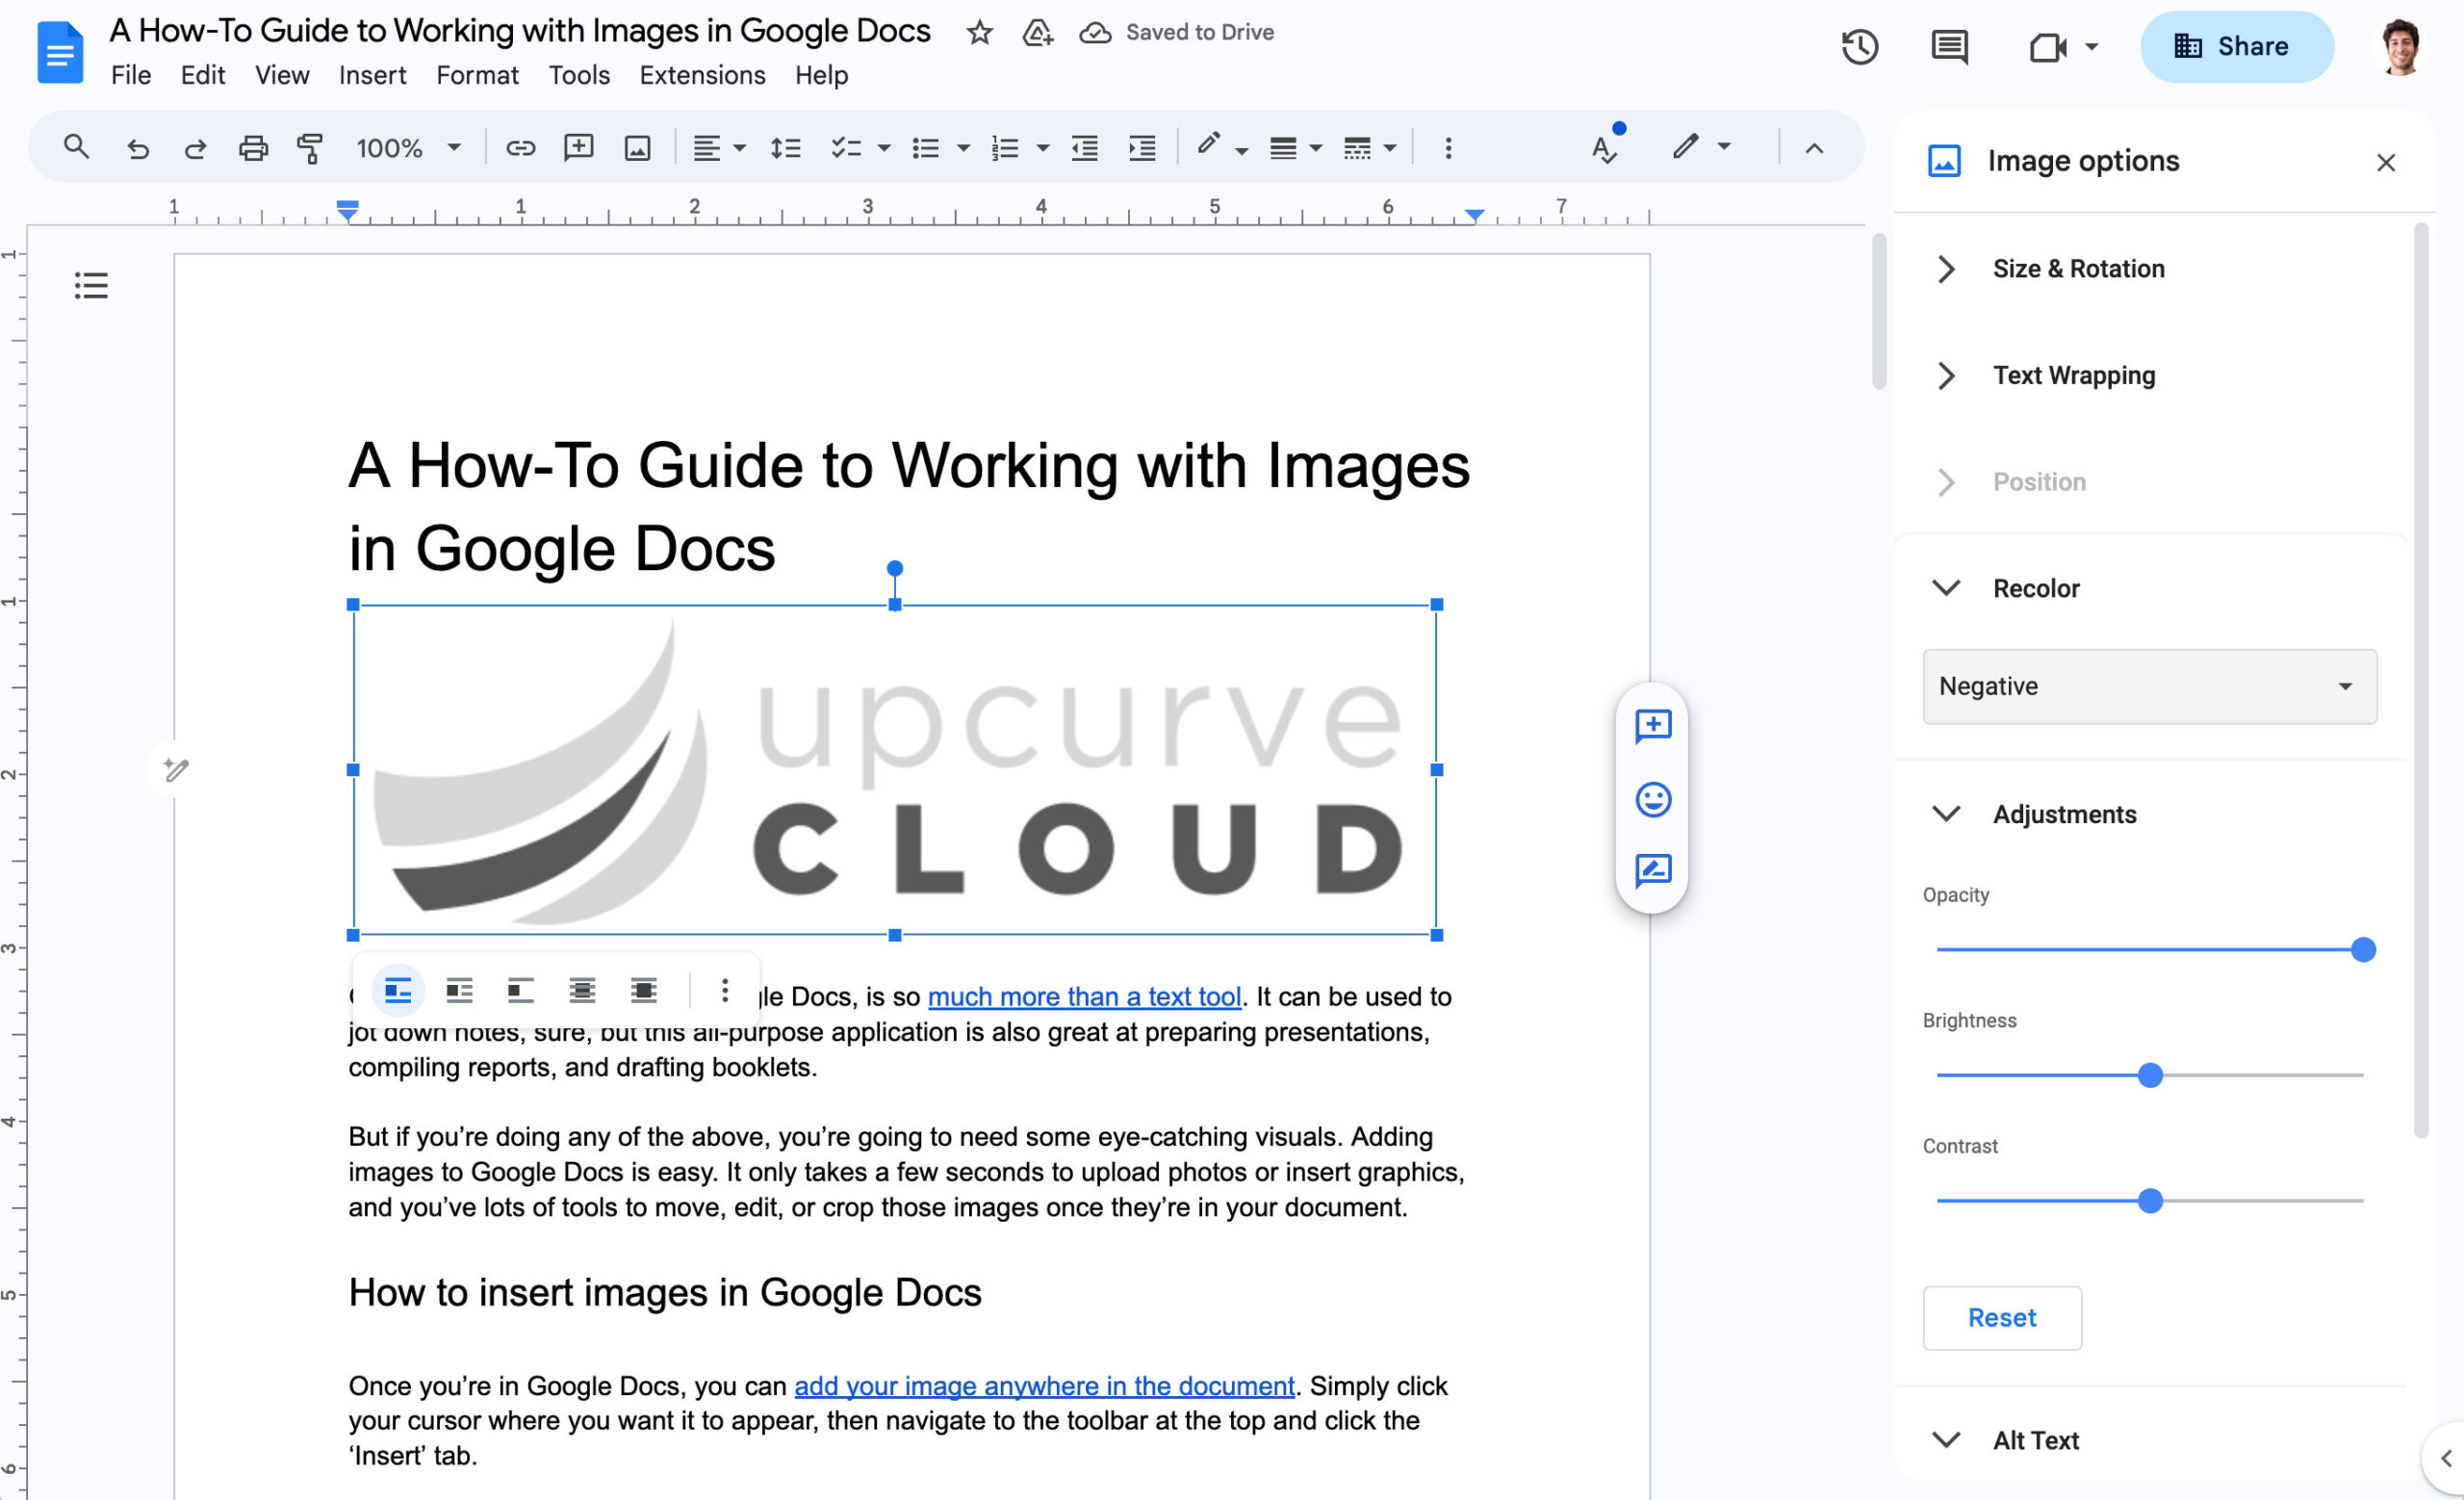
Your image can be crafted further by adjusting its size, color, and even the contrast in brightness between the page and the graphic to make it pop. To explore these settings, click on your image and then click on ‘Image options’ in the pop-up toolbar at the top of your window.
A left-hand menu with headings including ‘Size and rotation’, ‘adjustment’ and ‘recolor’ will appear. Using these, you can add a filter to your image, change the color, crop it, adjust its opacity, add a title, and more.
How to flip an image in Google Docs
If you’ve got an image of a signpost pointing the wrong way or a staircase leading in the wrong direction, you can flip your image using the rotation tool in the ‘Image options’ menu. Under the ‘Size & Rotation’ header, you’ll see a rotating toggle where you can either flip it 90 degrees or choose your own angle to put your image on a tilt.
How to add a caption to an image in Google Docs
Captions allow you to add explanatory notes to your images - making your document more accessible for the visually impaired or simply giving it a more professional look.
Unfortunately, Google Docs doesn’t have a built-in caption feature (yet!), but there are several hacks to add your own. The easiest is to select the ‘In line’ formatting for your image and simply type your caption underneath your image.
Alternatively, you can use the drawing tool:
- Click Insert > Drawing > New
- Add your image to the drawing window, and place a text box below it with your caption
How to save an image from Google Docs
If you’ve pulled an image from the web, you may want to save it for future reference or repeated use. In that case, simply right-click on the image and click ‘Save to Keep’ from the dropdown menu.
The Keep application is like your own personal virtual notepad. It’s a place to store notes in the cloud without downloading them to your computer and clogging up your storage space. This virtual repository holds your images as notes. When you want to view or use them, head to keep.google.com. You can add notes to your image, import it into another Google Doc, or archive it.
How to download an image from Google Docs
Unfortunately, downloading an image from Google Docs to your computer isn’t as simple as right-clicking and saving. There are a few workarounds, however.
If you are okay with making your document public, the fastest way is to pull your image from its URL:
- Click File > Share > Publish to web
- That will generate a URL for your Doc, open that page in a new tab
- Right-click the image you want and select ‘Save image As’
If you want to save multiple images from a document, your best option is to convert your Doc to a webpage and then extract the images from the file. This has the added benefit of keeping your Doc private.
- Click File > Download > Web Page
- This will download to your computer as a zipped file from which you can extract all your images
If you’re going to be regularly grabbing images from your documents, it’s worth installing the Images Extractor & Remover add-on for Google Docs. This lets you pull images right from the Doc and save them to your Google Drive. It also works on bulk images so you can download several at once - although the free version will only process the first four images of a document.
To get the Images Extractor & Remover add-on:
- Click Extensions > Add-ons > Get add-ons
- Type ‘Images Extractor & Remover for Docs’ into the search bar in the pop-up window
- Click ‘Install’
Once installed, the extension is really easy to use - just go back to ‘Add-ons’, click ‘Image extractor’ and ‘start’. Click on the image you want to save and hit ‘Download’.
Using Google Docs to make your team more productive
Google Workspace was designed with productivity in mind, and Google Docs is one of the most efficient applications for busy teams.
Most know it as a writing tool, but Docs is a full-service product with impressive design features and editing capabilities. Getting to grips with these often-overlooked tools means even the most tech-phobic employees can produce professional-looking documents quickly and efficiently.
To find out more about Google Docs or how to maximize your organization’s use of any apps in the Google ecosystem, contact our team of Google-certified engineers and consultants. A Google Cloud Premier Partner, UpCurve Cloud can help you streamline your entire tech stack, integrating Google’s productivity tools so your team has the infrastructure it needs to thrive and grow. Schedule a consultation today to get started!
Contact Us to Learn More about Transforming Your Business
