Since its introduction in 2006, Google Docs has become one of the world’s leading word processing tools. More than thirteen years later, users continue to praise Google Docs for its functionality, ease of use, privacy and sharing options, and the ability to easily collaborate in real-time with multiple users. Docs is available for free to everyone and is available to business users in G Suite, Google’s suite of cloud-based productivity and collaboration tools. More than five million businesses around the world are currently using Docs and other G Suite tools that allow them to work smarter and faster.
Despite the widespread use of Docs, many users have yet to master the many formatting features found within Google Docs. Document formatting controls let employees and students create, edit, and work within a wide variety of document types, including reports, resumes, brochures, proposals, letters, and more. Mastering the art of formatting in Docs means that your documents will give you the flexibility needed to excel, and means that your files are sure to impress employers, clients, and professors. Here are a few ways you can become a Google Docs formatting guru.
New update adds customizable headers and footers
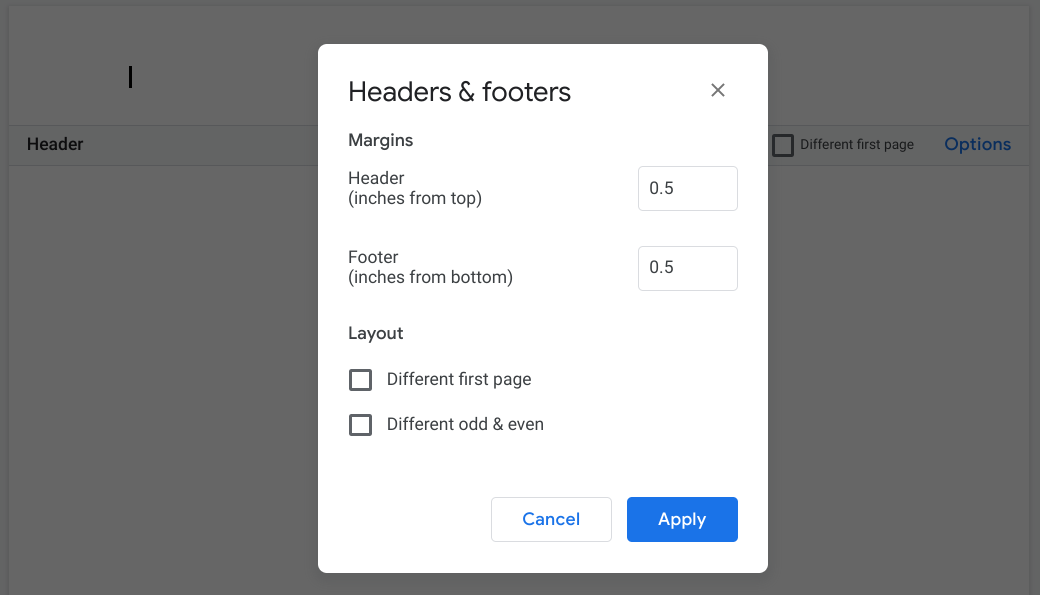
Google has recently added new controls for customizing headers and footers within Docs, giving users even more freedom to easily format and customize their word documents to look professional for any workplace or educational environment. The new update allows users to easily define specific headers and footers for different sections of a document, allowing for the use of various headers and footers on odd and even pages.

Before the update, Docs users were limited to setting a single header and footer throughout documents. To test out the new features, try adding page numbers or titles to the headers or footers in your document. You’ll be presented with options that include “Different first page” and “Different odd & even”, which allows you to change the header and footer settings on odd and even-numbered pages.
Edit header and footer margins and add page numbers
To change the header and footer margins, simply click in the desired header or footer, navigate to the “Headers & footers” option under the “Format” tab, and select “More options”. Here, you’ll be able to enter custom margin sizes, add section breaks, or completely remove headers or footers. If you wish to add automatic page numbers or a total page count to your document, select “Header & page number” under the “Insert” tab. You’ll then be able to choose where page numbers go and if you wish for the first page to be skipped, and can add a page count to the document.
Use section breaks for cleaner documents
Section breaks are often used to format a document and split it into various sections. Section breaks can be easily added in Docs by selecting “Break” under the “Insert” tab - this will allow you to choose a “Page break” that starts on a new page, a “Section break (continuous)” that starts a new section on the same page, or a “Section break (next page)” that begins a new section on the next page. The margins between section breaks can then be moved or adjusted to help you better organize content. This can be done with multiple sections by selecting “Page Setup” under the “File” tab. From there, choose which sections of your document you wish to change, set margins, and select “Ok”.

Stay organized with document outlines
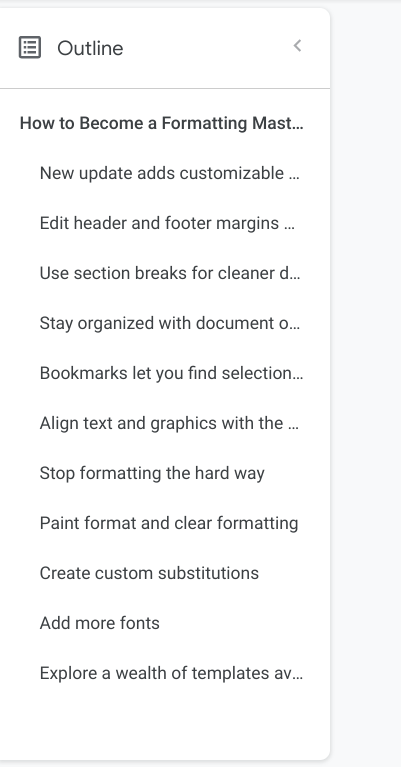
Document outlines are one of the best ways to keep complex documents organized and under control, allowing you to view the outline of your document at a glance and be able to focus on editing its structure. Using the document outline, you can navigate through your entire document by clicking on the headings that appear in the document outline section, saving you from scrolling endlessly through long documents.
Document outline can be turned on and off by clicking on “Show document outline” under the “View” tab. Docs will automatically add headings to your outline based on headings within your text, but you can add your own by using different heading styles listed under “Normal text” on the format bar at the top of your browser. If you see any headings you wish to remove, simply select “Remove from outline” in the document outline view.
Bookmarks let you find selections quickly
Another great tool for keeping long documents organized is the Bookmark feature, which helps you automatically navigate to selected sections of your Doc. To use the Bookmark feature, select the desired section and click on “Bookmark” under the “Insert” tab. This will mark the selected section with an easily identifiable blue bookmark to help you find or identify important points faster than ever before.
Align text and graphics with the ruler
The ruler feature is a long-standing staple of word processors, letting users quickly align text, tables, graphics, and more. Both horizontal and vertical rulers are available in Google Docs, being automatically displayed in new documents. If you wish to work without the use of rulers, select “Show ruler” under the “View” tab to quickly hide them.
Stop formatting the hard way
When working on documents of any importance, consistent formatting is important. Fonts, font sizes, headings, and spacing should be consistent to make an impression on important clients, colleagues, employers, and professors. Google Docs makes formatting documents to your liking simple, giving you all the tools needed to create seamless and readable documents that will make an impact.
If you find yourself constantly changing fonts and line spacing because the default options aren’t cutting it, you can change the defaults by highlighting a selection of text that has been formatted to your liking, then selecting “Paragraph styles” under the “Format” tab. From here, select “Options” and choose “Save as my default styles. Voila, these options will be saved for future Docs.
Paint format and clear formatting
To copy formatting from an area of text within your document and apply it to other text selections, use the “Paint format” option (visualized as a paint roller) located on the format taskbar. The paint format option allows you to quickly apply preferred formatting by simply clicking on paragraphs you’d like to apply this format to - letting you change font, text size, style, and color with the click of a button. Additionally, if you’re often copying text from other sources and constantly fixing formatting, you can return it to default values by selecting “Clear formatting” (Ctrl+\), which will save you from having to manually format pasted text.

Create custom substitutions
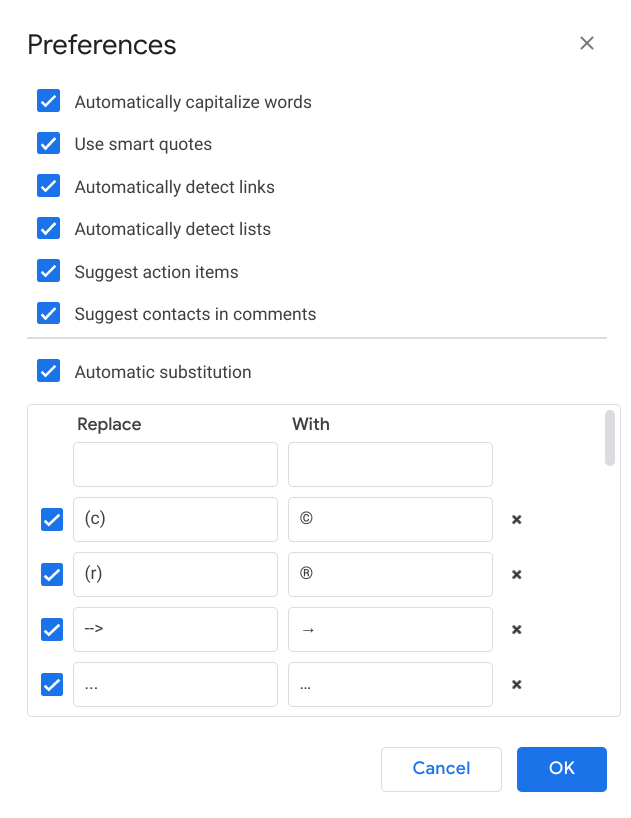
While Google Docs comes with a variety of default substitutions, you may also want to make some of your own to speed up processes. These can easily be done by navigating to “Preferences” under the “Tools” tab. From there, select “Automatic Substitution”, which will present a table that lets you create custom substitutions. For example, you can change your initials to your full name, autofill email addresses, create custom abbreviations, or ensure that commonly misspelled words are automatically substituted with the correct spelling. Here, you’ll also be able to select or deselect the “Automatically detect links” and “Automatically detect lists” options to save you from having to manually format links and lists.
Add more fonts
Google Docs comes preloaded with several varying fonts, with some of them featuring additional options for light to bold characteristics. While these default fonts are perfectly acceptable, there are plenty more fonts available to you. To find them, select “More fonts” in the font selection dropdown list. This will present with you a new window containing hundreds of additional fonts to add to Google Docs. If you’re looking for something specific, you can search for fonts, or sort them by script, style, popularity, date added, trending, or view them alphabetically. You can also find these on Google Fonts, where you can view previews, search, and instantly add them to Docs once you’ve found that perfect font.
Explore a wealth of templates available at your disposal
Google Docs is the perfect tool for creating and working within a variety of documents. The template gallery gives you access to dozens of pre-generated templates that save you hours of manual formatting. The gallery can be accessed from your Google Docs hub by choosing “Template gallery” under the “Start a new document” heading. In the template gallery, you’ll be met with dozens of customizable templates for project proposal documents, professional resumes, business, and personal letters, meeting minutes and notes, onboarding notes, brochures, newsletters, sales quotes, formatted essays, and much more. Simply select the template you wish to work within and it will automatically be generated in a new document.
With over 5 million businesses currently using G Suite and updates coming regularly, there’s no better time to implement the cloud-based productivity solution into your organization. Empower your employees by giving them instant access to a suite of collaborative tools that encourage productivity, communication, and efficiency. Find out how UpCurve Cloud can improve the way you do business by seamlessly implementing and integrating solutions like G Suite into your workplace by contacting us today.
Contact Us to Learn More about Transforming Your Business
